

Annonces MicroBook
Alerte nouvelle annonceNews

Images


Avis
 Thiazsch
Très déçu par MOTU
Publié le 13/01/16 à 00:04Je suis sur Windows 7, pas trop de soucis d'installation mis à part un gros problème qui me fait écrire cet article, de rage.
Dès le début j'ai eu de gros soucis d'alimentation par l'USB, dès le premier jour, je ne pouvais ni brancher mon clavier ni ma souris USB simultanément à cette carte, je dois même dire que j'ai déjà branché de nombreux périphériques en même temps : clavier + souris + disque dur + clé USB + imprimante/scanner, etc... sans aucun soucis.
Alors j'ai eu du mal à saisir pourquoi il m'était impossible d'utiliser à la fois la...…
Je suis sur Windows 7, pas trop de soucis d'installation mis à part un gros problème qui me fait écrire cet article, de rage.
Dès le début j'ai eu de gros soucis d'alimentation par l'USB, dès le premier jour, je ne pouvais ni brancher mon clavier ni ma souris USB simultanément à cette carte, je dois même dire que j'ai déjà branché de nombreux périphériques en même temps : clavier + souris + disque dur + clé USB + imprimante/scanner, etc... sans aucun soucis.
Alors j'ai eu du mal à saisir pourquoi il m'était impossible d'utiliser à la fois la Microbook et une souris ou un clavier.
Bref je contacte la SAV de MOTU qui me font comprendre que je dois m'acheter un HUB auto-alimenté, ce que je fais donc, guère le choix.
Oui mais voilà, je ne sais pas comment cette fichue carte gère son alimentation, mais depuis j'ai intérêt à bien vérifier chaque enregistrement car j'ai de nombreux clics numériques qui apparaissent, là à chaud je viens juste de foirer quelques prises de son dont j'étais très content, s'il n'y avait ce "petit" problème.
Pour l'histoire, la Microbook s'est vite faite remplacée par la microbook2, avec afficheurs de volumes et contrôles sur le dessus, j'espère amélioration de certains bugs, j'ai l'amère impression d'avoir fait partie des bons pigeons à avoir acheté ce prototype de carte en version Beta afin de sortir un modèle correct un an après.
J'ai bien sûr essayé de l'échanger directement chez MOTU, faut pas rêver.
Bref je vous maudis MOTU.
Et je vous déconseille à quiconque.
 Anonyme
 Interface idéale pour la reproduction.
Publié le 11/07/11 à 12:43Table de mix intégrée et assez complète (solo, mute, slider de niveau, bargraph pour chaque mix et final out. Pas d'insert possible.
Equal et compression en pre et out
Pas de traitement par PC, les DSP sont hardware et une fois réglés par logiciel, si on connecte cette carte sur un autre PC, elle garde ses réglages...
Qualité sonore casque (testé sur Seinheizer HD 280) très finie et détaillée
Stabilité des drivers sous WIN7 64b testée et solide.
UTILISATION
Drivers pour WIN7 64bits hyper stables
Pas de logiciel spécifique de musicien mais sortie directe sur Harmann Kardon par SPDIF
Latence avec un piano midi, possible 4 ms sans craquements.
Je l'ai aussi testée avec un...…
Table de mix intégrée et assez complète (solo, mute, slider de niveau, bargraph pour chaque mix et final out. Pas d'insert possible.
Equal et compression en pre et out
Pas de traitement par PC, les DSP sont hardware et une fois réglés par logiciel, si on connecte cette carte sur un autre PC, elle garde ses réglages...
Qualité sonore casque (testé sur Seinheizer HD 280) très finie et détaillée
Stabilité des drivers sous WIN7 64b testée et solide.
UTILISATION
Drivers pour WIN7 64bits hyper stables
Pas de logiciel spécifique de musicien mais sortie directe sur Harmann Kardon par SPDIF
Latence avec un piano midi, possible 4 ms sans craquements.
Je l'ai aussi testée avec un micro shure (SM558), les équalisations paramétriques 7 bandes font des miracles et aussi le compresseur, sauf qu'il n'est pas multi bandes, mais encore une fois, c'est une carte qui me sert à la repro et pas à la conception musicale. (Il faut arrêter de croire qu'on peut faire du son pro avec des cartes dont ce n'est pas le segment.)
Pour un musicien scène seul ou accompagné d'un piano, çà devrait faire le boulot, attention pas d'entrée midi, mais on peut se procurer une interface midi séparée.
MISE EN OEUVRE
Installation facile et sans difficulté avec le logiciel fourni avec le cdrom joint
Manuel video et PDF
Supporte sans problème un arrêt du PC et la remise en route se se fait automatiquement sans perdre le flux USB, je n'en dirai pas autant de la Fast Track qui se plaît à décrocher dès qu'elle le peut: (les drivers étant très instables autant sur XP que Vista et WIN 7 surtout le gros bug des 24 bits incompatible de PC à Fast Track: voir les forums ricains pour info).
Pour la microbook, pas de problème pour du 24 bits 48 Khz, les concepteurs logiciel ont apparemment bien travaillé.
Sortie SPDIF toujours active et reproduisant le MAIN (pratique)
Faire attention à la bande passante USB (70% requis pour la microbook, on peut pas brancher une autre carte en même temps sans devoir faire des ajustements.
AVIS GLOBAL
Qualité des basses et des médiums aigues, rien à voir avec une Fast track M audio
Si je devais faire du mix en caf conc', je prendrai l'Ultra lite MK3 MOTU
Rapport Qualité prix correct par rapport à ce qu'offrent d'autres marques.
Mes enceintes Klipsch ne montrent aucune résonance sur tout le spectre, ce qui est un signe de bonne tenue en phase du signal, dès qu'on touche à l'équal, le son peut devenir très gros et dense sans perdre de percussion.
Pour le recording, les 48 Khz d'échantillonnage sont un peu limite, mais je ne l'ai pas achetée pour çà.
Ha le détail qui tue: il y a un loop back qui permet d'utiliser Audacity à partir de la carte son et de bénéficier aussi des réglages et d'une absence de bruit total sur le recording d'une station de radio par exemple,il n'est pas facile de trouver comment renvoyer le son de la carte vers le PC, mais çà marche.
Au final, je trouve cette interface pratiquement parfaite pour l'usage que j'en fais, pour faire plus et plus compliqué, il faut monter en gamme (audio express, ultralite...)
 coolwaiss
Motu de poche
Publié le 22/05/11 à 21:37UTILISATION
Audiodesk natif.Pas de latence car je n'enregistre pas beaucoup de pistes simultanément.
MISE EN OEUVRE
Mise en oeuvre facile.RAS
AVIS GLOBAL
- Pas de boutons +la taille,la mobilité ,l'auto alimentation.A utiliser avec un préampli externe portable
 Hug42
Hug42Excellent
Publié le 04/12/10 à 10:47Certes la microbook est l'entrée de gamme des interfaces audio MOTU, mais ce qui ma poussé a la choisir c'est que je n'ai pas besoin de plus d'entrées et que les convertisseurs MOTU sont les mêmes que ces grandes sœurs.
Pour quel usage ?
Je travaille avec Ableton Live. Les samples et loops sont ma matière première, déformant les sons pour en créer d'autres, j'ai besoin d'un son clair et précis. La microbook à donc un rôle important pour la composition et le mixage du morceau.
UTILISATION
Les drivers sont-ils stables ?
L'installation est super facile et les drivers ne posent aucun problèmes, le sérieux de MOTU est au...…
Certes la microbook est l'entrée de gamme des interfaces audio MOTU, mais ce qui ma poussé a la choisir c'est que je n'ai pas besoin de plus d'entrées et que les convertisseurs MOTU sont les mêmes que ces grandes sœurs.
Pour quel usage ?
Je travaille avec Ableton Live. Les samples et loops sont ma matière première, déformant les sons pour en créer d'autres, j'ai besoin d'un son clair et précis. La microbook à donc un rôle important pour la composition et le mixage du morceau.
UTILISATION
Les drivers sont-ils stables ?
L'installation est super facile et les drivers ne posent aucun problèmes, le sérieux de MOTU est au rendez-vous.
Néanmoins il faudra régler la latence (host buffer multiplier) en fonction de sa configuration MAC ou PC. Pour ma part je ne peux descendre en dessous de 4(8ms) sous peine d'entendre des craquement quand je travaille dans Live.
Le nombre de pistes lue est de l'ordre de 40 à 50 suivant différents paramètres (nombre de plugins, taille des fichiers audio ...).
Petite précision, les EQ et compresseurs présents sur chaque entrées et sorties sont remarquables. Mais le logiciel séquenceur fournit avec ne fonctionne que sur MAC.
Ma configuration PC : Intel celeron 2.50 Ghz 4 Go RAM Windows 7 64-bit, Asus comme carte mère.
MISE EN OEUVRE
La configuration générale est-elle facile ?
Au départ il faut un peux chipoter car il n'y a pas de manuel en français. Mais après c'est relativement simple et pas mal de possibilités s'offrent à vous.
Avez vous rencontré des incompatibilités ?
Non
AVIS GLOBAL
Depuis combien de temps l'utilisez vous ?
4 mois
Aviez vous essayé beaucoup d'autres modèles avant de l'acquérir ?
Oui
Comment jugez vous le rapport qualité/prix ?
le prix est justifié en comparaison de la qualité du produit.
Avec l'expérience, referiez vous ce choix ?
Oui
Fiche technique
- Fabricant : MOTU
- Modèle : MicroBook
- Série : MicroBook
- Catégorie : Interfaces audio USB
- Fiche créée le : 29/06/2010
MicroBookTM User Guide
1280 Massachusetts Avenue Cambridge, MA 02138 Business voice: (617) 576-2760 Business fax: (617) 576-3609 Web site: www.motu.com Tech support: www.motu.com/support
SAFETY PRECAUTIONS AND ELECTRICAL REQUIREMENTS
WARNING: TO REDUCE THE RISK OF FIRE OR ELECTRICAL SHOCK, DO NOT EXPOSE THIS APPLIANCETO RAIN OR OTHER MOISTURE.
CAUTION: TO REDUCE THE RISK OF ELECTRICAL SHOCK, DO NOT REMOVE COVER. NO USER-SERVICEABLE PARTS INSIDE. REFER SERVICING TO QUALIFIED SERVICE PERSONNEL.
WARNING: DO NOT PERMIT FINGERS TO TOUCH THE TERMINALS OF POWER PLUGS WHEN INSTALLING OR REMOVINGTHE PLUGTO OR FROM A POWER SOURCE.
IMPORTANT SAFEGUARDS
-
Readinstructions—AllthesafetyandoperatinginstructionsshouldbereadbeforeoperatingtheMicroBook.
-
Retaininstructions—Thesafetyinstructionsandowner'smanualshouldberetainedforfuturereference.
-
HeedWarnings—AllwarningsontheMOTUMicroBookandintheowner'smanualshouldbeadheredto.
-
FollowInstructions—Alloperatinganduseinstructionsshouldbefollowed.
-
Cleaning—UnplugtheMOTUMicroBookfromthecomputerbeforecleaninganduseadampcloth.Donotuseliquidor aerosol cleaners.
-
PowerSources—ThisMOTUMicroBookshouldbeoperatedonlyfromthetypeofpowersourceindicatedonthemarking label.
-
Power-CordProtection—Power-supplycordsshouldberoutedsothattheyarenotlikelytobewalkedonorpinchedby items placed upon or against them. Pay particular attention to cords and plugs, convenience receptacles, and the point where they exit from the MOTU MicroBook.
-
Lightning—ForaddedprotectionfortheMOTUMicroBookduringalightningstorm,unplugitspowersupplyfromanywall outlets.This will prevent damage to the MOTU MicroBook due to lightning and power line surges.
-
Servicing—DonotattempttoservicethisMOTUMicroBookyourselfasopeningorremovingcoverswillexposeyouto dangerous voltage and other hazards. Refer all servicing to qualified service personnel.
-
DamageRequiringService—UnplugtheMOTUMicroBookfromthecomputerandreferservicingtoqualifiedservice personnel under the following conditions.
-
Whenthepowersupplycordorplugisdamaged.
-
IfliquidhasbeenspilledorobjectshavefallenintotheMOTUMicroBook.
-
If the MOTU MicroBook has been exposed to rain or water.
-
IftheMOTUMicroBookdoesnotoperatenormallybyfollowingtheoperatinginstructionsintheowner'smanual.
-
IftheMOTUMicroBookhasbeendroppedorthecabinethasbeendamaged.
-
When the MOTU MicroBook exhibits a distinct change in performance, this indicates a need for service.
-
-
ReplacementParts—Whenreplacementpartsarerequired,besuretheservicetechnicianhasusedreplacementparts specified by the manufacturer or have the same characteristics as the original part. Unauthorized substitutions may result in fire, electric shock or other hazards.
-
SafetyCheck—UponcompletionofanyserviceorrepairstothisMOTUMicroBook,asktheservicetechniciantoperform safety checks to determine that the product is in safe operating conditions.
ENVIRONMENT
Operating Temperature: 10°C to 40°C (50°F to 104°)
AVOID THE HAZARDS OF ELECTRICAL SHOCK AND FIRE
Do not handle the power supply, or power cables with wet hands.
CAUTION: DANGER OF EXPLOSION IF BATTERY IS REPLACED. REPLACE ONLY WITH THE SAME OR EQUIVALENT TYPE RECOMMENDED BYMANUFACTURER. DISPOSE OF USED BATTERY ACCORDINGTO MANUFACTURER’S INSTRUCTIONS.
About the Mark of the Unicorn License Agreement and Limited Warranty on Software
TO PERSONS WHO PURCHASE OR USE THIS PRODUCT: carefully read all the terms and conditions of the “click-wrap” license agreement presented to you when you install the software. Using the software or this documentation indicates your acceptance of the terms and conditions of that license agreement.
Mark of the Unicorn, Inc. (“MOTU”) owns both this program and its documentation. Both the program and the documentation are protected under applicable copyright, trademark, and trade-secret laws.Your right to use the program and the documentation are limited to the terms and conditions described in the license agreement.
Reminder of the terms of your license
This summary is not your license agreement, just a reminder of its terms. The actual license can be read and printed by running the installation program for the software.That license agreement is a contract, and clicking “Accept” binds you and MOTU to all its terms and conditions. In the event anything contained in this summary is incomplete or in conflict with the actual click-wrap license agreement, the terms of the click-wrap agreement prevail. YOU MAY: (a) use the enclosed program on a single computer; (b) physically transfer the program from one computer to another provided that the program is used on only one computer at a time and that you remove any copies of the program from the computer from which the program is being transferred; (c) make copies of the program solely for backup purposes.You must reproduce and include the copyright notice on a label on any backup copy.
YOU MAY NOT: (a) distribute copies of the program or the documentation to others; (b) rent, lease or grant sublicenses or other rights to the program; (c) provide use of the program in a computer service business, network, time- sharing, multiple CPU or multiple user arrangement without the prior written consent of MOTU; (d) translate, adapt, reverse engineer, decompile, disassemble, or otherwise alter the program or related documentation without the prior written consent of MOTU.
MOTU warrants to the original licensee that the disk(s) on which the program is recorded be free from defects in materials and workmanship under normal use for a period of ninety (90) days from the date of purchase as evidenced by a copy of your receipt. If failure of the disk has resulted from accident, abuse or misapplication of the product, then MOTU shall have no responsi- bility to replace the disk(s) under this Limited Warranty.
THIS LIMITED WARRANTY AND RIGHT OF REPLACEMENT IS IN LIEU OF, AND YOU HEREBY WAIVE, ANY AND ALL OTHER WARRANTIES, BOTH EXPRESS AND IMPLIED, INCLUDING BUT NOT LIMITED TO WARRANTIES OF MERCHANTABILITY AND FITNESS FOR A PARTICULAR PURPOSE. THE LIABILITY OF MOTU PURSUANT TO THIS LIMITED WARRANTY SHALL BE LIMITED TO THE REPLACEMENT OF THE DEFECTIVE DISK(S), AND IN NO EVENT SHALL MOTU OR ITS SUPPLIERS, LICENSORS, OR AFFILIATES BE LIABLE FOR INCIDENTAL OR CONSEQUENTIAL DAMAGES, INCLUDING BUT NOT LIMITED TO LOSS OF USE, LOSS OF PROFITS, LOSS OF DATA OR DATA BEING RENDERED INACCURATE, OR LOSSES SUSTAINED BY THIRD PARTIES EVEN IF MOTU HAS BEEN ADVISED OF THE POSSIBILITY OF SUCH DAMAGES. THIS WARRANTY GIVES YOU SPECIFIC LEGAL RIGHTS WHICH MAY VARY FROM STATE TO STATE. SOME STATES DO NOT ALLOW THE LIMITATION OR EXCLUSION OF LIABILITY FOR CONSEQUENTIAL DAMAGES, SO THE ABOVE LIMITATION MAY NOT APPLY TO YOU.
Update Policy
In order to be eligible to obtain updates of the program, you must register the software at motu.com.
Copyright Notice
Copyright © 2010 by Mark of the Unicorn, Inc. All rights reserved. No part of this publication may be reproduced, transmitted, transcribed, stored in a retrieval system, or translated into any human or computer language, in any form or by any means whatsoever, without express written permission of Mark of the Unicorn, Inc., 1280 Massachusetts Avenue, Cambridge, MA, 02138, U.S.A.
Limited Warranty on Hardware
Mark of the Unicorn, Inc. and S&S Research (“MOTU/S&S”) warrant this equipment against defects in materials and workmanship for a period of TWO (2)YEARS from the date of original retail purchase.This warranty applies only to hardware products; MOTU software is licensed and warranted pursuant to separate written statements.
If you discover a defect, first write or call Mark of the Unicorn at (617) 576- 2760 to obtain a Return Merchandise Authorization Number. No service will be performed on any product returned without prior authorization. MOTU will, at its option, repair or replace the product at no charge to you, provided you return it during the warranty period, with transportation charges prepaid, to Mark of the Unicorn, Inc., 1280 Massachusetts Avenue, MA 02138.You must use the product’s original packing material for in shipment, and insure the shipment for the value of the product. Please include your name, address, telephone number, a description of the problem, and the original, dated bill of sale with the returned unit and print the Return Merchandise Authorization Number on the outside of the box below the shipping address. This warranty does not apply if the equipment has been damaged by accident, abuse, misuse, or misapplication; has been modified without the written permission of MOTU, or if the product serial number has been removed or defaced.
ALL IMPLIED WARRANTIES, INCLUDING IMPLIED WARRANTIES OF MERCHANTABILITY AND FITNESS FOR A PARTICULAR PURPOSE, ARE LIMITED IN DURATION TO TWO (2) YEARS FROM THE DATE OF THE ORIGINAL RETAIL PURCHASE OF THIS PRODUCT.
THE WARRANTY AND REMEDIES SET FORTH ABOVE ARE EXCLUSIVE AND IN LIEU OF ALL OTHERS, ORAL OR WRITTEN, EXPRESS OR IMPLIED. No MOTU/S&S dealer, agent, or employee is authorized to make any modification, extension, or addition to this warranty. MOTU/S&S ARE NOT RESPONSIBLE FOR SPECIAL, INCIDENTAL, OR CONSEQUENTIAL DAMAGES RESULTING FROM ANY BREACH OF WARRANTY, OR UNDER ANY LEGAL THEORY, INCLUDING LOST PROFITS, DOWNTIME, GOODWILL, DAMAGE OR REPLACEMENT OF EQUIPMENT AND PROPERTY AND COST OF RECOVERING REPRO- GRAMMING, OR REPRODUCING ANY PROGRAM OR DATA STORED IN OR USED WITH MOTU/S&S PRODUCTS.
Some states do not allow the exclusion or limitation of implied warranties or liability for incidental or consequential damages, so the above limitation or exclusion may not apply to you.This warranty gives you specific legal rights, and you may have other rights which vary from state to state.
MOTU, AudioDesk, Mark of the Unicorn and the unicorn silhouette logo are trademarks of Mark of the Unicorn, Inc.
This equipment has been type tested and found to comply with the limits for a class B digital device, pursuant to Part 15 of the FCC Rules. These limits are designed to provide reasonable protection against harmful interference in a residential installation. This equipment generates, uses, and can radiate radio frequency energy and, if not installed and used in accordance with the instruction manual, may cause harmful interference to radio communications. However, there is no guarantee that interference will not occur in a particular installation. If this equipment does cause interference to radio or television equipment reception, which can be determined by turning the equipment off and on, the user is encouraged to try to correct the interference by any combination of the following measures:
• Relocate or reorient the receiving antenna
• Increase the separation between the equipment and the receiver
• Plug the equipment into an outlet on a circuit different from that to which the receiver is connected
If necessary, you can consult a dealer or experienced radio/television technician for additional assistance.
PLEASE NOTE: only equipment certified to comply with Class B (computer input/ output devices, terminals, printers, etc.) should be attached to this
equipment, and it must have shielded interface cables in order
to comply with the Class B FCC limits on RF emissions.
WARNING: changes or modifications to this unit not expressly approved by the party responsible for compliance could void the user's authority to operate the equipment.
Contents
-
5 Quick Reference: MicroBook Front Panel
-
6 Quick Reference: MicroBook Rear Panel
-
7 Quick Reference: CueMix FX
9 About the MicroBook
13 Packing List and System Requirements 15 Installing the MicroBook Hardware
21 Installing the MicroBook Software
23 Mac OS X Audio Software
33 Windows Audio Software 39 CueMix FX
49 Troubleshooting
51 Mic Adapter Pin-outs
53 Index
3
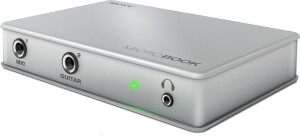
1. Plug in your dynamic or condenser mic here. If your mic cable has a standard male XLR connector, use
the female XLR-to-TRS adapter included with your MicroBook. IMPORTANT: be sure to use the 2. included adapter, or make sure
that requires it is plugged in. Never enable 48V power when a tip/sleeve (unbalanced) plug is connected to the mic input.
3. When this power LED flashes, it 4. means that the MicroBook has
USB bus power and it is establish- ing communication with the computer.When the LED glows steadily, the MicroBook is ready to go. If the power LED continues to flash and never goes solid, see Appendix A,“Troubleshooting”
This is a standard eighth-inch “stereo mini” headphone jack. Use the on-screen CueMix FX software mixer to control its level, indepen- dently from other output pairs.
that the adapter you use is wired as shown in Appendix B,“Mic Adapter Pin-outs” page (51).
Plug in your guitar here using a standard quarter-inch guitar cable.This input is designed with the high-impedance characteris- tics necessary to properly handle both passive and active guitar pickups.To make your guitar sound and “feel” even more like it is plugged directly into a actual guitar amplifier, consider using MOTU’s ZBox guitar impedance adapter (sold separately), which simply goes between your guitar cable and this input (no extra cable needed).
page (49).
Use the on-screen CueMix FX software to engage the 20 dB pad and/or 48V phantom power (for a condenser mic), if necessary.
To obtain your product serial number, see “Obtain- ing your MicroBook serial number” on page 14.
Make sure 48V power is turned OFF BEFORE plugging
anything in to the mic input. Only engage 48V power when a device
For volume control, launch CueMix on
your computer and use these
Quick Reference: MicroBook Front Panel
1234
1. The MicroBook is powered by its USB connection to the computer.
the right. DO NOT plug a cable into this mini jack at the same time as the quarter-inch jacks.
signals (either -10 or +4).The 6. CueMix FX software lets you
adjust the input level for record- ing.If you use these quarter inch jacks, DO NOT plug a cable in to
These two balanced, quarter- inch jacks serve as the Micro- Book’s main outputs.You can connect them to a set of powered studio monitors and then control the volume from MAIN volume control in the CueMix FX software.You can hear the output of your audio software on these Main Outs, and also use CueMix FX to monitor live MicroBook inputs.
2. This stereo, 24-bit S/PDIF digital output mirrors the Main Out.
4. These two analog inputs are balanced TRS (tip/ring/sleeve) quarter-inch connectors that can also accept an unbalanced plug.These inputs (3-4) do not have mic pre-amps, so they are best used for synthesizers, drum machines, effects processors, and other devices with line level
3. This eighth-inch“stereo mini” jack serves as an alternative input for Line Inputs 3-4. For example, you can plug in an iPod or CD player here, instead of using the quarter-inch jacks to
the stereo mini jack.
Quick Reference: MicroBook Rear Panel
123456
5. This eighth-inch “stereo mini” jack serves as a stereo line level analog output that is completely independent from the Main Out (to the right).
QCHAuPiTcERk Reference: CueMix FX
Launch CueMix FX (in your Mac Applications folder or in the Windows Start menu under Programs>MOTU>CueMix FX) to control the MicroBook. This chapter gives you a quick overview. For further details, see chapter 7,“CueMix FX” (page 39).
123456
-
Input settings include trim level, mono/stereo toggle, EQ and dynamics. For more input settings (pad, phantom power, etc.) click the Focus button and go to the Channel tab.
-
The MicroBook provides five different stereo mix busses. Use the Mix tab to mix sources (inputs, host computer audio, etc.) for each mix bus. See “The Mixes tab” on page 43.
3. Output settings include 5. choosing what you will hear
on each output (a mix bus,
inputs, host computer audio, 6. or a signal generator
), EQ, and dynamics. See the
next page, or “The Outputs
tab” on page 44 for more info. 7.
4. Click a focus button (in the 8. Inputs, Outputs, or Mixes tabs)
to view individual channel
settings here in the Channel,
987
Control the volume of the MicroBook’s outputs here.
Assign outputs to the Monitor group (via the buttons) and control them all here.
Monitor Group metering.
Signal Generator tab provides settings for white/pink noise and a sine wave generator.
EQ and Dynamics tabs.
9. Metersforallins/outs/busses.
7
154
2
3
-
Click the Outputs tab to access settings for the MicroBooks outputs. For example, you can choose one of five different mixes for each output.
-
Choosetheaudiosourcefor each output pair from these menus.The MicroBook gives you a lot of flexibility, as shown in the menu to the right.You can choose one of the five mixes, which let you mix inputs with computer audio. Or you can choose an input or computer audio directly (the From Host option). A mix can go to as many outputs as you want.
Choosing Sine, White, or Pink 3. produces a sine wave or white/ pink noise from the Micro-
Book’s signal generator (item
8 on the previous page).
If you want to apply EQ or dynamics processing to the output, click here to enable it and then adjust settings in the channel section (4).
-
Adjustoutputsettingsinthe EQ and dynamics tabs here. In the EQ tab, click the power icon to enable an EQ band and then either adjust its knobs or drag its settings directly in the graph above.
-
Use this menu to access the sonogram waterfall, real time FFT display, and other diagnostic tools. See “Audio analysis tools” on page 47.
8
CHAPTER 1
About the MicroBook
Overview
The MicroBook is a USB audio interface for Mac and Windows with on-board effects and mixing that offers four inputs and eight outputs for recording and playback at industry standard sample rates of 44.1 or 48 kHz. All inputs and outputs can be accessed simultaneously. The MicroBook consists of a light and small aluminum alloy-encased interface that connects directly to a computer via a standard USB cable.
The MicroBook offers the following main features:
■ 4-input, 2-output bus-powered “plug-and-play” USB audio interface for Mac and Windows.
-
4 x 8 physical input/output channels.
-
10-bus digital mixer to route and mix
live inputs with live computer tracks.
■ Preamp-equipped mic input with Precision Digital TrimTM, 48V phantom power, and 20 dB pad.
■ Guitar input with 20 dB pad and Precision Digital Trim.
■ Stereo line level analog input on balanced quarter-inch (TRS) or stereo mini connectors.
■ Stereo line level analog main outs on balanced quarter-inch (TRS) connectors.
■ Stereo eighth-inch “mini” line-level out.
Obtaining your MicroBook serial number
The MicroBook holds its serial number electronically in the unit itself. To obtain the serial number, follow the hardware and software installation instructions in this booklet, and then do the following:
1Launch the CueMix FX software. 2Choose Devices menu>
MicroBook> Setup.
Figure 1-1: The Setup window.
3The serial number is shown at the bottom of the Setup window, as shown in Figure 1-1.
ABOUT THE MICROBOOK
9
■ S/PDIF digital out on RCA (duplicates Main Out).
■ Headphone output on an eighth-inch stereo “mini” jack with independent volume control.
■ Operation on all analog and digital I/O at standard sample rates of 44.1 or 48 kHz.
■ Digitally controlled analog trim for the mic and guitar inputs.
-
Digital trim for all outputs.
-
CueMixTM FX no-latency mixing and monitoring with EQ and dynamics processing.
■ 7-band parametric EQ and compression.
■ Test tone and white/pink noise generator.
■ Advanced audio analysis software tools, including FFT “waterfall” display, oscilloscope, X-Y plot, and phase torch.
■ Compatible with all current and recent generation Macs and PCs.
■ Mac and Windows drivers for across- the-board compatibility with any audio software.
■ Includes AudioDeskTM full-featured audio workstation software for
Mac OS X, USB cable, and mic cable adapter.
With a variety of I/O formats, dedicated mic and guitar inputs, and no-latency mixing and processing of live input, the
MicroBook is a complete, portable “studio in a box” when used with a Mac or Windows computer.
Precision Digital TrimTM
The MicroBook’s mic and guitar inputs are equipped with digitally controlled analog trims with up to 51 dB and 32 dB of boost, respectively, using the included CueMix FX software for Mac OS X and Windows. This allows you to fine-tune trim settings for optimum levels. Different trim configurations can then be saved as files on disk for instant recall.
16-bit and 24-bit recording
The MicroBook system handles all data with a 24-bit signal path, regardless of the I/O format.You can record and play back 16-bit or 24-bit audio files at any supported sample rate via any of the MicroBook’s inputs and outputs.
CueMix FX mixing and effects
All MicroBook inputs and outputs can be routed to the on-board CueMix FX 10-bus (5 stereo) digital mixer driven by hardware-based DSP. The mixer allows you to apply no-latency EQ and dynamics processing to inputs, outputs or busses directly in the MicroBook hardware, independent of the computer. Input signals to the computer can be recorded wet, dry, or dry with a wet monitor mix (for musicians during recording, for example).
Effects include parametric EQ and compression/limiting. Standard compression provides conventional threshold, ratio, attack, release, trim, and
10
ABOUT THE MICROBOOK
knee controls. The 7-band parametric EQ is modeled after British analog console EQs, featuring four filter styles (gain/Q profiles) to effectively cover a wide range of audio material. Low-pass and high-pass filters are also supplied with slopes that range from 6 to 36 dB.
The MicroBook’s flexible effects architecture allows you to apply EQ and compression on every input and output.
Mac audio software
The MicroBook system includes a standard Mac OS X CoreAudio driver for multichannel I/O with any audio application that supports CoreAudio, such as the included AudioDesk software and Digital Performer.
Windows audio software
The MicroBook ships with standard Windows drivers that allow you to record, edit, play back and mix your MicroBook projects using your favorite Windows audio software.
ABOUT THE MICROBOOK 11
12 ABOUT THE MICROBOOK
CHAPTER 2 Packing List and System Requirements
PACKING LIST
The MicroBook ships with the items listed below. If any of these items are not present in your MicroBook box when you first open it, please immediately contact your dealer or MOTU.
-
One MicroBook
-
One USB cable (Type A to Type B)
-
One mic cable plug adapter
-
One MicroBook Mac/Windows User Guide
■ One cross-platform Universal Audio Installer disc
-
MicroBook product registration card
-
One peel-off sheet of rubber feet
MAC SYSTEM REQUIREMENTS
The MicroBook system requires the following Mac system:
WINDOWS SYSTEM REQUIREMENTS
The MicroBook system requires the following Windows system:
■ Pentium 4 1 GHz Pentium CPU (or AMD equivalent) or faster
■ At least 256 MB (megabytes) of RAM; 512 MB or more is recommended
-
Windows 7 or Vista
-
A large hard drive, preferably at least
100 GB
PLEASE REGISTER TODAY!
Please register your MicroBook today. There are two ways to register.
■ Visit www.motu.com/register to register online
OR
■ Fill out and mail the included product registration card
As a registered user, you will be eligible to receive technical support and announcements about product enhancements as soon as they become available. Only registered users receive these special update notices, so please register today.
You need your MicroBook serial number to register
To register your MicroBook, you need
your unit’s serial number. See “Obtaining your MicroBook serial number” on
page 14.
■ PowerPC G4 1 GHz Power Mac or faster CPU (including PowerPC G5 CPUs and all Intel processor Macs)
■ At least 256 MB (megabytes) of RAM; 512 MB or more is recommended
■ Mac OS X version 10.5 or 10.6; 10.5.6 or later is required.
■ A large hard drive, preferably at least 100 GB
PACKING LIST AND SYSTEM REQUIREMENTS 13
Mac users: be sure to register AudioDesk
If you are a Mac user, be sure to register
the included AudioDesk software, which must be registered separately. You can do so online at motu.com/register. Doing so will allow you to be eligible to receive technical support and announcements about AudioDesk software enhancementsassoonastheybecome available.
Thank you for taking the time to register your new MOTU products!
OBTAINING YOUR MICROBOOK SERIAL NUMBER
The MicroBook holds its serial number electronically in the unit itself. To obtain the serial number, follow the hardware and software installation instructions in the next two chapters, and then do the following:
1 LaunchCueMixFX.
2 ChooseDevicesmenu>MicroBook>
Setup.
Figure 2-1: The Setup window.
3 Theserialnumberisshownatthe bottom of the Setup window, as shown in Figure 2-1.
14 PACKING LIST AND SYSTEM REQUIREMENTS
CHAPTER 3 Installing the MicroBook Hardware
OVERVIEW
Windows users: install the software first . . . . 15
ConnecttheMicroBookinterface........... 15 Connectaudioinputsandoutputs.......... 16 Buspower ..................................18 AtypicalMicroBooksetup..................19
WINDOWS USERS: INSTALL THE SOFTWARE FIRST
If you are using the MicroBook with a Windows computer, installation goes much more smoothly if you install the MicroBook software before you connect the MicroBook hardware. Proceed to chapter 4,“Installing the MicroBook Software” (page 21) first, and then return to this chapter to then proceed with the hardware installation.
CONNECT THE MICROBOOK INTERFACE
1 PlugtheMicroBookUSBcable (included) into a USB socket on the computer as shown below in Figure 3-1.
2 PlugtheotherendoftheUSBcable into the MicroBook as shown in Figure 3-1.
Figure 3-1: Connecting the MicroBook to the computer.
INSTALLING THE MICROBOOK HARDWARE 15
CONNECT AUDIO INPUTS AND OUTPUTS
Here are a few things you should keep in mind as you are making input and output connections to other devices.
Mic input with preamp
Connect a dynamic or condenser microphone to the mic input (Figure 3-2) with a standard mic cable. If the cable has a quarter-inch plug, connect it directly. If it has a male XLR plug, use the female- XLR-to-quarter-inch adapter included with the MicroBook.
☛ The mic cable adapter supplied with the MicroBook is wired specifically for the MicroBook mic input, so do not use a substitute, unless you are certain it is wired as shown in Appendix B,“Mic Adapter Pin-outs” page (51).
☛ Do not connect a +4 (line level) input to the mic input (because it will overdrive the preamp).
Phantom power
If you are connecting a condenser microphone or other device that requires 48V phantom power, you can enable phantom power for the mic input using the MicroBook’s CueMix FX software (Figure 3-4). See “Input settings” on page 17.
Figure 3-2: MicroBook front panel
☛ Make sure 48V power is turned OFF before plugging anything in to the mic input. Only engage 48V power
when a device that requires it is plugged in. Never enable 48V power when a tip/sleeve (unbalanced) plug is connected to the mic input.
20 dB pad
If the input signal is still too hot with the trim turned all the way down, engage the 20dB pad button in the CueMix FX Channel tab (Figure 3-4). See “Input settings” on page 17.
Guitar input
Plug in your guitar to the guitar input (Figure 3-2). For ultra-realistic sound and feel when producing guitar tones with virtual guitar processing software (amp modeling, cabinet modeling, virtual effects pedals, etc.), consider using MOTU’s ZBox guitar impedance adapter (sold separately), which adds proper impedance characteristics that cannot be modeled in software. Visit motu.com for details.
Line level inputs
The quarter-inch analog line level inputs 3-4 (Figure 3-3) are balanced (TRS) connectors that can also accept an unbalanced plug. Alternately, you can use
16 INSTALLING THE MICROBOOK HARDWARE
the eighth-inch stereo mini plug for line level input (from an iPod or other source).
☛ Do not use the stereo mini input and quarter-inch inputs at the same time. If you are using the mini jack, unplug the quarter-inch jacks. If you are using the quarter-inch jacks, unplug the mini jack.
Trim
The mic and guitar inputs are equipped with 51 dB and 32 dB (respectively) of digitally controlled analog trim (boost). The line inputs can also be trimmed. You can adjust the trim level for each input in the MicroBook’s CueMix FX software. See “Input settings” on page 17.
Input metering while adjusting trim
In the CueMix FX software, use the long- throw, horizontal input level meter at the top of the channel settings section (Figure 3-4) to calibrate the level.
Input settings
To access input channel settings such as 48V phantom power, pad and trim, launch the MicroBook’s CueMix FX software and follow this procedure:
1 ClicktheInputstab(asshownon page 7).
Figure 3-3: MicroBook back panel
2 Click the Focus button for the desired input channel.
3 ClicktheChanneltab(Figure3-4)to access the channel’s input settings.
Figure 3-4: Input settings in CueMix FX.
Main outs
In a standard studio configuration, the main outs (Figure 3-3) are intended for a pair of studio monitors, but they can also be used as outputs for any purpose. The quarter-inch main outs are calibrated to produce a +4 dBu line level output signal.
Line out
You can use the eighth-inch stereo mini line out jack for output to desktop speakers or any other line level destination.
INSTALLING THE MICROBOOK HARDWARE 17
Digital out
The S/PDIF RCA “digital out” connector provides stereo digital audio output to another device: the S/PDIF output always mirrors the Main Outs.
BUS POWER
Bus power requirements
The MicroBook draws all the power it needs from the USB bus connection to the computer. However, the USB connection to the computer must meet all of the requirements discussed below.
USB adapter products must be powered
If you are using a USB adapter or hub (a third-party product that supplies one or more USB ports to your computer), it must have direct access to a power supply:
■ PCI USB cards — If you plan to connect the MicroBook to a PCI card and run the MicroBook under bus power, the PCI card must have a direct connection to the power supply harness inside your computer. This is the same power supply harness to which you connect internal hard drives, CD/DVD drives, etc.
■ PCMCIA, Cardbus or ExpressCard slot adapters — If you plan to connect the MicroBook to a PC card, Cardbus or ExpressCard USB adapter (inserted in the card slot in your laptop), it must provide a powered connection and it must also have its own power supply. Most commonly, these types of products have a DC power adapter that plugs into an AC wall outlet. As you can see,
however, this situation does not allow for remote battery operation, as the card adapter requires AC.
Examples of bus- powered operation
Here are a few typical examples of bus- powered MicroBook operation:
Bus power from a desktop computer
Your desktop computer is running off of its usual AC power connection, and the MicroBook draws power from the USB cable connected to the computer. There are no limits to running time.
Bus power from an AC-powered laptop
This scenario is identical to the desktop situation described above: the laptop is powered by AC, the MicroBook is powered via the USB bus and there are no limits to running time.
Bus power from a battery-powered laptop
The laptop is being powered by its own battery, and the MicroBook is being powered by its USB connection to the computer, so the laptop battery is supplying power to both the laptop and the MicroBook. This is the most compact and portable operating scenario. Running time is determined by the capacity of the laptop battery. For extended recording sessions, bring extra, fully charged laptop batteries.
18 INSTALLING THE MICROBOOK HARDWARE
A TYPICAL MICROBOOK SETUP
Here is a typical MicroBook studio setup. This rig can be operated without an external mixer.All mixing and processing can be done either in the MicroBook, in the computer with audio software, or both. During recording, you can use the
MicroBook’s CueMixTM FX mixer to apply EQ and compression to what you are recording and monitor it via the main outs, headphone outs, or any other output pair. You can control everything from the included CueMix FX software.
Mic
Headphones
Guitar (with or without an amp)
Home theater system
Monitors
Synthesizer
Computer
Figure 3-5: A typical MicroBook studio setup.
INSTALLING THE MICROBOOK HARDWARE 19
20 INSTALLING THE MICROBOOK HARDWARE
CHAPTER 4 Installing the MicroBook Software
MACSOFTWAREINSTALLATION
To install the MicroBook software:
1 InserttheMOTUUniversalInstaller disc and launch the installer.
2 Followthedirectionsthattheinstaller gives you.
What does the installer do?
The installer checks the computer to make sure it satisfies the minimum system requirements for your MOTU interface. If so, the installer proceeds with the Mac OS X installation. Drivers are installed, along with the CueMix FX application.
WINDOWS SOFTWARE INSTALLATION
Before you connect the MicroBook audio interface to your PC and turn it on, insert the MOTU Audio installer disc and run the MicroBook Installer. This ensures that all the MicroBook components are properly installed in your system.
If Windows asks you to locate the drivers
If you’ve already connected the
MicroBook to your computer and switched it on, Windows probably issued an alert notifying you that the MicroBook requires drivers, followed by another window asking you to locate the drivers on disk. If this happens:
2 SwitchofftheMicroBook.
3 RuntheMicroBookSoftwareInstaller
as instructed in the next section.
Installing the MicroBook software
ToinstalltheMicroBooksoftware,insert the MOTU Audio installer disc and follow the directions it gives you on your computer screen. Also be sure to read the Read Me file for installation assistance.
CUEMIX FX
The CueMix FX application provides a mixing console that gives you control over the MicroBook’s on-board mixing, EQ and dynamics processing. It also provides access to all MicroBook settings. For details, see chapter 7, “CueMix FX” (page 39).
AUDIODESK WORKSTATION SOFTWARE (MAC ONLY) AudioDesk is an advanced digital audio workstation software package for the MicroBook that lets you record, edit, mix, process, bounce and master multi- track digital audio recording projects. Advanced features include real-time 32-bit effects processing, 24-bit recording, and much more.
See the AudioDesk User Guide PDF manual for details.
1 Cancelthedriversearch.
INSTALLING THE MICROBOOK SOFTWARE 21
Figure 4-1: AudioDesk for Mac OS X.
22 INSTALLING THE MICROBOOK SOFTWARE
CHAPTER 5 Mac OS X Audio Software
OVERVIEW
The MicroBook provides audio input and output for all Mac OS X Core Audio applications, including AudioDesk, Digital Performer, Apple’s Logic Pro, Logic Express, SoundTrack Pro, and GarageBand. Other third-party software applications are also supported, such as Ableton Live, Propellerhead Reason, Steinberg Cubase and others.
Installing the MicroBook Mac OS X drivers . . 23
RunningCueMixFX......................... 23
ChoosingtheMicroBookdriver............. 23
Samplerate.................................27
ClockSource................................27
BufferSize ..................................27
Inputsandoutputs ......................... 27
Processing live inputs with host-based effects plug-ins.....................................27
Working with CueMix FX mixing and effects 27 24-bitoperation ............................ 27 Monitoringliveinput ....................... 28 AdjustingtheaudioI/Obuffer .............. 29 CueMixFXhardwaremonitoring ........... 31
INSTALLING THE MICROBOOK MAC OS X DRIVERS
To install the MicroBook’s Mac OS X audio drivers, just run the installer on the MOTU Audio installer disc as detailed in chapter 4,“Installing the MicroBook Software” (page 21).
RUNNING CUEMIX FX
Before you run your host audio software, launch CueMix FX to configure your MicroBook hardware. Running CueMix
FX confirms that the MicroBook hardware is connected, powered up, and functioning normally. It also lets you configure the MicroBook’s inputs and outputs. For a quick overview, see chapter ,“Quick Reference: CueMix FX” (page 7). For further details about the MicroBook settings, see chapter 7, “CueMix FX” (page 39).
Figure 5-1: CueMix FX.
CHOOSING THE MICROBOOK DRIVER
Once you’ve made the preparations described so far in this chapter, you’re ready to run your audio software and enable the MOTU MicroBook Core Audio driver. Check the audio system or audio hardware configuration window in your software. There will be a menu there that lets you choose among various drivers that may be in your system. Choose the MOTU MicroBook from this menu, as discussed in the following sections.
MAC OS X AUDIO SOFTWARE
23
AudioDesk
Choose the MicroBook as your audio input output device by choosing MOTU Audio System options>Configure Hardware Driver from the Setup menu. This window shows MicroBook settings such as sample rate and clock source.
Figure5-2:Enabling the MicroBook in AudioDesk.
Exchanging projects with Digital performer
To open AudioDesk Version 3 (or Version 1 or 2) files in Digital Performer, just use DP’s File menu> Open command. (No conversion is required beforehand in AudioDesk.) To export a Digital Performer project to AudioDesk, use Save A Copy As in Digital Performer’s File menu and choose the AudioDesk 3.0 file format. Then open the resulting AudioDesk 3.0 document in AudioDesk.
Digital Performer
Choose the MicroBook as your audio input output device by choosing Configure Audio System> Configure Hardware Driver from the Setup menu. This window shows MicroBook settings such as sample rate and clock source.
Figure5-3:Enabling the MicroBook in Digital Performer.
Exchanging projects with AudioDesk
Digital Performer can exchange projects with AudioDesk. To open an AudioDesk project in Digital Performer, open it in same way you would a DP project. To export a project to AudioDesk, use DP’s File menu> Save A Copy As command and choose the AudioDesk 3.0 file format.
24
MAC OS X AUDIO SOFTWARE
Logic Pro and Logic Express
In Logic Pro and Logic Express, go to the Preferences window, click the Audio tab, click the Drivers tab and click the Core Audio tab as shown in Figure 5-4. Choose the MOTU MicroBook from the Driver menu. For information about the I/O Buffer Size setting, see “Adjusting the audio I/O buffer” on page 34.
Garage Band
In Garage Band, go to the Audio/MIDI preferences and choose MOTU MicroBook from the Audio Output and Audio Input menus (Figure 5-6). For information about the Optimize for setting, see “Adjusting the audio I/O buffer” on page 34.
Figure 5-4: Enabling the MicroBook in Logic Pro or Logic Express.
Soundtrack Pro
In Soundtrack Pro, access the preferences window, click the Recording tab and choose MOTU MicroBook from the Input and Monitor menus as shown below in Figure 5-5.
Figure5-6:Enabling the MicroBook in Garage Band.
Cubase and Nuendo
Go to the Devices menu and choose Device Setup. Click the VST Audio System item in the Devices list and choose MOTU MicroBook from the Master ASIO Driver menu as shown below in
Figure 5-7. Activate the inputs and outputs within Cubase or Nuendo as usual. For information about the Audio Buffer Size setting, see “Adjusting the audio I/O buffer” on page 34.
Figure 5-7: Enabling the MicroBook audio driver in Cubase.
Figure 5-5: Enabling the MicroBook in Soundtrack Pro.
MAC OS X AUDIO SOFTWARE
25
Managing inputs and outputs
To manage MicroBook inputs and outputs, select MOTU MicroBook ASIO in the left-hand section (Figure 5-8).
Reason and Record
In Propellerhead Reason and Record, go to the Preferences window, choose Audio preferences from the menu and choose MOTU MicroBook from the Audio Output menu as shown below in Figure 5-10. For information about the Buffer Size setting, see “Adjusting the audio I/O buffer” on page 34.
Figure 5-8: Working with MicroBook inputs and outputs in Cubase or Nuendo
Live
In Ableton Live, access the preferences window and click the Audio tab. Choose CoreAudio from the Driver Type menu. Choose the MOTU MicroBook from the Input Audio Device and Output Audio Device menus (Figure 5-9). For information about the Buffer Size setting, see “Adjusting the audio I/O buffer” on page 34.
Figure 5-10: Enabling the MicroBook in Reason.
Other audio software
For other audio applications, the procedure is similar to that shown above. Consult your owner’s manual for further information.
Figure 5-9: Enabling the MicroBook in Live.
26
MAC OS X AUDIO SOFTWARE
SAMPLE RATE
Choose the desired overall sample rate for the MicroBook system and your host software. Newly recorded audio will have this sample rate.
CLOCK SOURCE
Some host software may have a “clock source” setting. For the MicroBook, there isonlyonechoiceforclocksource: Internal.
BUFFER SIZE
Most host applications provide a Buffer setting, which can be adjusted to reduce the delay — or monitoring latency — that you hear when live audio is patched through your host software. For example, you might have a mic, guitar, and MIDI synth connected to the analog inputs of the MicroBook. If so, you will often be mixing their live input with audio material recorded in your host software. See “Monitoring live input” below.
INPUTS AND OUTPUTS
Once you’ve enabled the MicroBook’s Core Audio driver, MicroBook audio inputs and outputs will appear in your host software wherever audio inputs and outputs are listed.
PROCESSING LIVE INPUTS WITH HOST-BASED EFFECTS PLUG-INS
If you patch a live input (such as a microphone or guitar) through a plug-in effect in your host software, you might hear a slight delay. There are several ways
to reduce this delay. For details, see chapter 7,“Reducing Monitoring Latency” (page 33).
WORKING WITH CUEMIX FX MIXING AND EFFECTS
The MicroBook provides powerful external mixing, EQ and compression, which you can operate hand-in-hand withyourhost’smixingenvironment.For example, the MicroBook can serve as a monitor mixer routing channels to musicians, or it can serve as an integrated extension of your host’s mixing environment. If you program a MicroBook mixing and processing configuration that goes hand in hand with your host project, be sure to use the configuration export features in CueMix FX to save the MicroBook settings as a file in your host project folder for instant recall of all settings. See chapter 7, “CueMix FX” (page 39) for complete details.
☛ In Digital Performer, you can set up your MicroBook configuration file as a DP startup clipping so that it automatically loads when you open the project. Refer to the Digital Performer User Guide for details.
24-BIT OPERATION
YourMicroBookhardwarefullysupports 24-bit recording with host software that also supports 24-bit operation. Consult the documentation for your host software for further information about enabling 24-bit operation.
MAC OS X AUDIO SOFTWARE
27
MONITORING LIVE INPUT
There are two ways to monitor live audio input with a MicroBook:
1 Throughthecomputer
2 Via the MicroBook CueMix FX
hardware mixer
Figure 5-11 below shows method #1, which allows you to apply host-based effects processing via plug-ins in your audio software. See the next section,
1. Live input (from mic, guitar, etc.) enters the MicroBook.
2. Mic signal goes immediately to the computer.
Computer
Figure 5-11: There are two ways to monitor live audio inputs with a MicroBook: 1) through the computer or 2) via CueMix FX hardware monitoring. This diagram shows method 1 (through the computer). When using this method, use your host software’s buffer setting to reduce the slight delay you hear when monitoring the live input, but don’t lower it too much, or your computer might get sluggish.
“Adjusting the audio I/O buffer” for details about how to reduce or eliminate the audible monitoring delay that the computer introduces.
Figure 5-12 on page 29 shows method #2. CueMix FX hardware-based monitoring lets you hear what you are recording with no monitoring delay and no computer- based effects processing. Rather, input is routed directly to an output, either with or without MicroBook-based effects processing (EQ or compression). See
3. Mic signal is ‘patched thru’ back to the audio interface with host-based plug-in effects, if any.
4. Mic signal (with plug-in processing, if any) is routed to the main outs (or other outputs that you’ve specified in the software).
28
MAC OS X AUDIO SOFTWARE
“CueMix FX hardware monitoring” later in this chapter for details on how to use CueMix FX with your audio software, or with CueMix FX.
If the material you are recording is suitable, there is a third way to monitor live input: use both methods (Figure 5-11 and Figure 5-12) at the same time. For example, you could route guitar to both the computer (for an amp model effect) and mix that processed signal on the main outs with dry guitar from
CueMix FX.
1. Live input (from mic, guitar, etc.) enters the MicroBook.
ADJUSTING THE AUDIO I/O BUFFER
A buffer is a small amount of computer memory used to hold data. For audio interfaces like the MicroBook, buffers are used for the process of transferring audio data in and out of the computer. The size of the buffers determines how much delay you hear when monitoring live inputs through your audio software: larger buffers produce more delay; smaller buffers produce less.
3. Mic signal is mixed to the main outs, and you can control the volume (relative to the rest of the mix) with the mic’s fader in CueMix FX.
2. CueMix FX immediately patches the live mic signal directly to the main outs (or other output), completely bypassing the computer. This signal could be dry, or with MicroBook effects processing, such as EQ or compression.
Figure 5-12: This diagram shows the signal flow when using CueMix FX no-latency monitoring. Notice that this method does not process the live input with plug-ins in your audio software. Instead, you can apply MicroBook effects, such as the EQ and/or compression.
MAC OS X AUDIO SOFTWARE 29
Under Mac OS X, audio I/O buffer size is handled by the host audio application (not the MicroBook Core Audio driver). Most audio software applications provide an adjustable audio buffer setting that lets you control the amount of delay you’ll hear when monitoring live inputs or processing them with software plug-ins. Below are a few examples. For more examples, see chapter 5,“Mac OS X Audio Software” (page 23).
Cubase
Figure 5-14: In Cubase or Nuendo, choose Devices menu> Device Setup and select the MicroBook to access the window above and the Audio Buffer Size setting (via the Control Panel button).
Logic
Digital Performer
Figure5-13:In Digital Performer and AudioDesk, choose Setup menu> Configure Audio System> Configure Hardware Driver to open the dialog shown above and access the Buffer Size setting. Refer to your Digital Performer or AudioDesk user guide for infor- mation about the Host Buffer Multiplier setting.
Figure 5-15: In Logic Pro or Logic Express, go to the Audio Driver preferences to access the I/O Buffer Size option shown above.
30
MAC OS X AUDIO SOFTWARE
Lower latency versus higher CPU overhead
The buffer setting has a large impact on the following things:
-
Patch thru latency
-
The load on your computer’s CPU
-
Possible distortion at the smallest settings
■ How responsive the transport controls are in your host audio software
The buffer setting presents you with a trade-off between the processing power of your computer and the delay of live audio as it is being patched through your software. If you reduce the size, you reduce patch thru latency, but may significantly increase the overall processing load on your computer, leaving less CPU bandwidth for things like real-time effects processing. On the other hand, if you increase the buffer size, you reduce the load on your computer, freeing up bandwidth for effects, mixing and other real-time operations.
Figure 5-16: When adjusting the buffer size to reduce monitoring latency, watch the ‘processor’ meter in Digital Performer or
AudioDesk’s Performance Monitor. If you hear distortion, or if the Performance meter is peaking, try raising the buffer size.
If you are at a point in your recording project where you are not currently working with live, patched-thru material (e.g. you’re not recording vocals), or if you have a way of externally processing inputs, choose a higher buffer size. Depending on your computer’s CPU speed, you might find that settings in the middle work best (256 to 1024).
Transport responsiveness
Buffer size also impacts how quickly your audio software will respond when you begin playback, although not by amounts that are very noticeable. Lowering the buffer size will make your software respond faster; raising the buffer size will make it a little bit slower, but barely enough to notice.
Effects processing and automated mixing
Reducing latency with the buffer size setting has another benefit: it lets you route live inputs through the real-time effects processing and mix automation of your audio software.
CUEMIX FX HARDWARE MONITORING
The MicroBook has a more direct method of patching audio through the system. This method employs the MicroBook’s CueMix FX digital mixer. When enabled, CueMix FX activates hardware patch-thru in the MicroBook itself. CueMix FX has two important benefits:
MAC OS X AUDIO SOFTWARE
31
■ It completely eliminates the patch thru delay (reducing it to a small number of samples — about the same amount as one of today’s advanced digital mixers).
■ CueMix FX imposes no strain on the computer.
The trade-off, however, is that
CueMix FX bypasses your host audio software. Instead, live audio inputs are patched directly through to outputs in the MicroBook itself and are mixed with disk tracks playing back from your audio software. This means that you cannot apply host-based plug-ins, mix automation, or other real-time effects that your audio software provides. But for inputs that don’t need these types of features, CueMix FX is the way to go.
On the other hand, if you really need to use the mixing and processing provided by your audio software, you should not use CueMix FX. Instead, reduce latency with the buffer setting (as explained earlier in this chapter).
Using CueMix FX
The CueMix FX software manages your monitor mix and runs side-by-side with your host audio software.
CueMix FX allows you to create up to five separate MicroBook stereo mixes, or any other desired routing configurations. These routings are independent of your host audio software. For complete details, see chapter 7, “CueMix FX” (page 39).
32
MAC OS X AUDIO SOFTWARE
CHAPTER 6 Windows Audio Software
OVERVIEW
The MicroBook includes an ASIO driver that provides multi-channel I/O with ASIO-compatible hosts such as Cubase, Nuendo, SONAR, Live, Reason, and more.
A standard Windows audio driver is also included for multi-channel audio input and output for any audio application that supports Windows multimedia audio drivers.
AbouttheASIOdriver.......................33 AbouttheWindowsaudiodriver ........... 33 Installing the MicroBook Windows drivers . . 34 RunningCueMixFX......................... 34 ChoosingtheMicroBookdriver............. 34 Samplerate.................................37 ClockSource................................37 Inputsandoutputs ......................... 37 Working with CueMix FX mixing and effects 37 24-bitoperation ............................ 38
ABOUT THE ASIO DRIVER
ASIO is an acronym for Audio Streaming Input and Output. The MOTU MicroBook ASIO driver provides multi- channel audio input and output for any audio application that supports ASIO drivers.
Attention: other software users
A number of popular ASIO-compatible applications are shown in this chapter. However, the basic procedures are the same and can be easily applied to any ASIO-compatiblesoftware.Justfollow the general descriptions at the beginning of each main section in this chapter. Consult your software documentation for details about each topic, if necessary.
ABOUTT
Distribué par MSC Distribution
Autres interfaces audio USB MOTU
Autres catégories dans Interfaces audio


Autres dénominations : microbook, micro book